
Intro
The goal of this tutorial is to describe Python development ecosystem. It can be helpful for someone coming to Python from another programming language.
They say that you should stick to algorithms and data structures, that you can learn a new language in just a couple of weeks, that it’s just a new syntax. I completely agree that algorithms and data structures are extremely important but when it comes to language it’s slightly more than just syntax. There is an entire infrastructure of tools and best practices around it. For someone coming from a different background, it can be overwhelming to keep up with all this stuff, especially taking into consideration that sometimes information should be found in different places.
This is my very opinionated attempt to compile some of the best practices on setting up a new Python environment for local development. There are also advices for integration these tools with Visual Studio Code, however, it’s not necessary to use this particular editor. I’m going to update this page as there are some changes with the underlying tools. I also plan to use it myself as a boilerplate for starting a new Python project. The tutorial is long because I explain in detail purpose and usage of the tools, however, the end result is quick set up of the new project environment that can be achieved in just a couple of minutes. See Fast Track section.
How to manage Python versions with pyenv?
Why use pyenv?
Many tutorials start with the same thing: go to python.org and download the latest version of the language for you platform. Don’t listen to them. There is a better way. And here is why.
There are different versions of Python and you would need switching between these versions while working on different projects.
There is probably some version of Python already coming with your operation system. For Mac it’s 2.7, some Linux distributions already switched to version 3. Even more, there is another Python installed as a part of Anaconda package. The bottom line is: you never know for sure which Python is going to be run as you type python in the command line.
At some point, there’s going to be a mess of different Python executables on your machine, and you will need some way of managing it. If only there was a tool for that.
And there is. It’s called pyenv - https://github.com/pyenv/pyenv
How to install pyenv?
Install for Mac:
brew update
brew install pyenv
For Linux you’d probably better off with pyenv installer - https://github.com/pyenv/pyenv-installer:
curl https://pyenv.run | bash
For Windows, there is pyenv for Windows - https://github.com/pyenv-win/pyenv-win.
But you’d probably better off with Windows Subsystem for Linux (WSL), then installing it the Linux way.
How to use pyenv?
First, we can see a list of all Python executables, if any, that are installed on your machine (at least the ones pyenv was able to find):
pyenv versions
* system (set by /Users/alex/.python-version)
Above shown the output for my machine. Here asterisk indicates the current active version of Python. So if I run
python -V
Python 2.7.16
we can see that MacOS is still shipped with Python 2.7 as a system executable.
Now let’s see all the available Python versions:
pyenv install --list
This will output a long list of different Python versions. You will be surprised how many Pythons there are. CPython implementations default to versions like 3.8.5, other have prefixes like pypy3.6-7.3.1.
If you want to see only CPython version, you can run something like this:
pyenv install --list | grep " 3\."
If you are using pyenv for quite some time, and there is no new version in the list, you should update pyenv itself:
brew upgrade pyenv
or
pyenv update
Versions with suffix -dev are currently in active development.
Let’s install the most new and stable Python version to the moment of writing this post
pyenv install 3.8.5
This downloads the source code and compiles it on your machine:
python-build: use [email protected] from homebrew
python-build: use readline from homebrew
Downloading Python-3.8.5.tar.xz...
-> https://www.python.org/ftp/python/3.8.5/Python-3.8.5.tar.xz
Installing Python-3.8.5...
python-build: use readline from homebrew
python-build: use zlib from xcode sdk
Installed Python-3.8.5 to /Users/alex/.pyenv/versions/3.8.5
If we run pyenv versions again, we see our new version in the list but it’s still not active
* system (set by /Users/alex/.python-version)
  3.8.5
We can verify it with python -V. Still
Python 2.7.16
pyenv allows us to set up any version of Python as a global Python interpreter but we are not going to do that. There can be some scripts or other programs that rely on the default interpreter, so we don’t want to mess that up. Instead, we are going to set up Python per project. So let’s create a project in the next section.
Alternative tool: asdf: https://asdf-vm.com/
Dependency management for Python with Poetry
Why use Poetry?
By default, Python packages are installed with pip install. In reality nobody uses it this way. It installs all your dependencies into one version of Python interpreter which messes up dependencies.
It’s a good practice to install dependencies per project. So each project only contains dependencies that are required for it, and nothing more. This also prevents conflicts of versions of different packages that are required for different projects.
To solve this problem, there is a concept of virtual environments. So each project has it’s own virtual environment with fixed Python version and fixed dependencies specific for this project.
Virtual environments evolved from venv, virtualenv, virtualenvwrapper to pipenv, and poetry. pipenv is very popular and was a good choice for a long time. There was some controversy about pipenv that is greatly covered by this blog post: Pipenv: promises a lot, delivers very little by Chris Warrick. One of the biggest concerns was delay in releases - there was no new release since 2018. Although, mid 2020 pipenv became active again with several new updates, lots of developers made up their mind already. Poetry gained some traction, in addition it claims to better resolve dependencies where pipenv fails. Also, Poetry can be helpful for open source projects as it helps publishing the package.
Poetry official website: https://python-poetry.org/
How to install Poetry?
So, let’s get it started. It is recommended to install Poetry on a system level.
For MacOS, Linux, and WSL:
curl -sSL https://raw.githubusercontent.com/python-poetry/poetry/master/get-poetry.py | python
If you use Powershell with Windows, there is a script for that on the official website but I personally suggest just using WSL.
To apply changes for your current shell session, run
source $HOME/.poetry/env
You may add this to the auto-run shell script like .bashrc or .zshrc if Poetry doesn’t appear in a new shell session:
export PATH="$HOME/.poetry/bin:$PATH"
You can also enable tab completions for your shell. The process is described here.
How to create new project with Poetry?
Poetry creates a folder structure for you, so make sure to change your current directory to one that is supposed to be a parent directory for the new project and then run:
poetry new my-project
where my-project is the name of the project. Put a name of your project instead.
Now, let’s see what Poetry created for us:
cd my-project; ls
How to set Python version per project?
We were still using old Python 2.7, remember? For our new project, we want to use modern version of Python, so we are back to pyenv tool. As we are still in the project directory, set Python version locally for this directory:
pyenv local 3.8.5
If we run pyenv versions now, we can see that 3.8.5 is marked with asterisk, so it’s active for this directory. Note that outside of this directory Python version remains the same as before.
system
* 3.8.5 (set by /Users/alex/iCloud/dev/projects/my-project/.python-version)
We can double check it with python -V.
Python 3.8.5
Now we make Poetry pick up current Python version:
poetry env use python
Creating virtualenv my-project-PSaGJAu6-py3.8 in /Users/alex/Library/Caches/pypoetry/virtualenvs
Using virtualenv: /Users/alex/Library/Caches/pypoetry/virtualenvs/my-project-PSaGJAu6-py3.8
As the last step of setting up Python version, let’s update pyproject.toml. [tool.poetry.dependencies] should reflect that supported version of Python is 3.8 or higher:
[tool.poetry]
name = "my-project"
version = "0.1.0"
description = ""
authors = ["Alex"]

[tool.poetry.dependencies]
python = "^3.8"

[tool.poetry.dev-dependencies]
pytest = "^5.2"

[build-system]
requires = ["poetry-core>=1.0.0a5"]
build-backend = "poetry.core.masonry.api"
How to use Poetry?
On the next step, you probably want to install your first dependency: some library or framework on top of which you plan to build the project. For example:
poetry add aiohttp
where aiohttp is the framework we install.
If you pull an existing project and want to install its dependencies for local development, simply run
poetry install
To bump all the dependencies to the latest versions:
poetry update
How to use Poetry with VS Code?
VS Code doesn’t detect Poetry automatically. Good news though, there is a simple way to make VS Code detect virtual environment created by Poetry.
First, we have to activate virtual environment:
poetry shell
Spawning shell within /Users/alex/Library/Caches/pypoetry/virtualenvs/my-project-PSaGJAu6-py3.8
➜  my-project . /Users/alex/Library/Caches/pypoetry/virtualenvs/my-project-PSaGJAu6-py3.8/bin/activate
(my-project-PSaGJAu6-py3.8) ➜  my-project
So now, as we are inside said virtual environment, we can call VS Code from it:
code .
Install Pylance - Python language server for VS Code.
As you open any Python file, VS Code immediately asks us to choose a Python interpreter
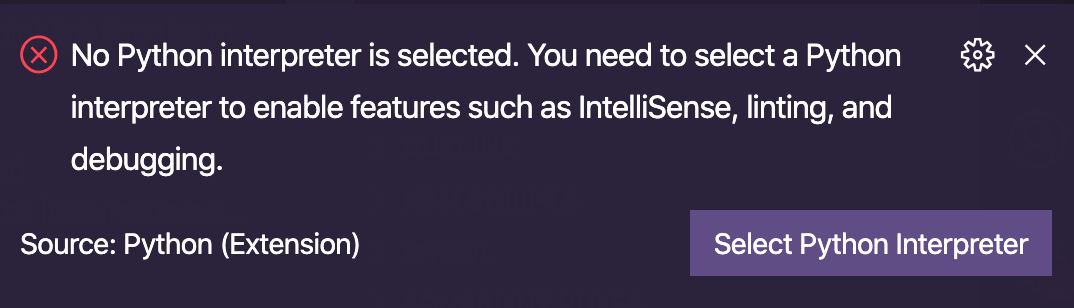
So let’s do exactly what we were asked. Because we called VS Code from within the virtual environment, the right interpreter will be presented as an option and we can choose it.
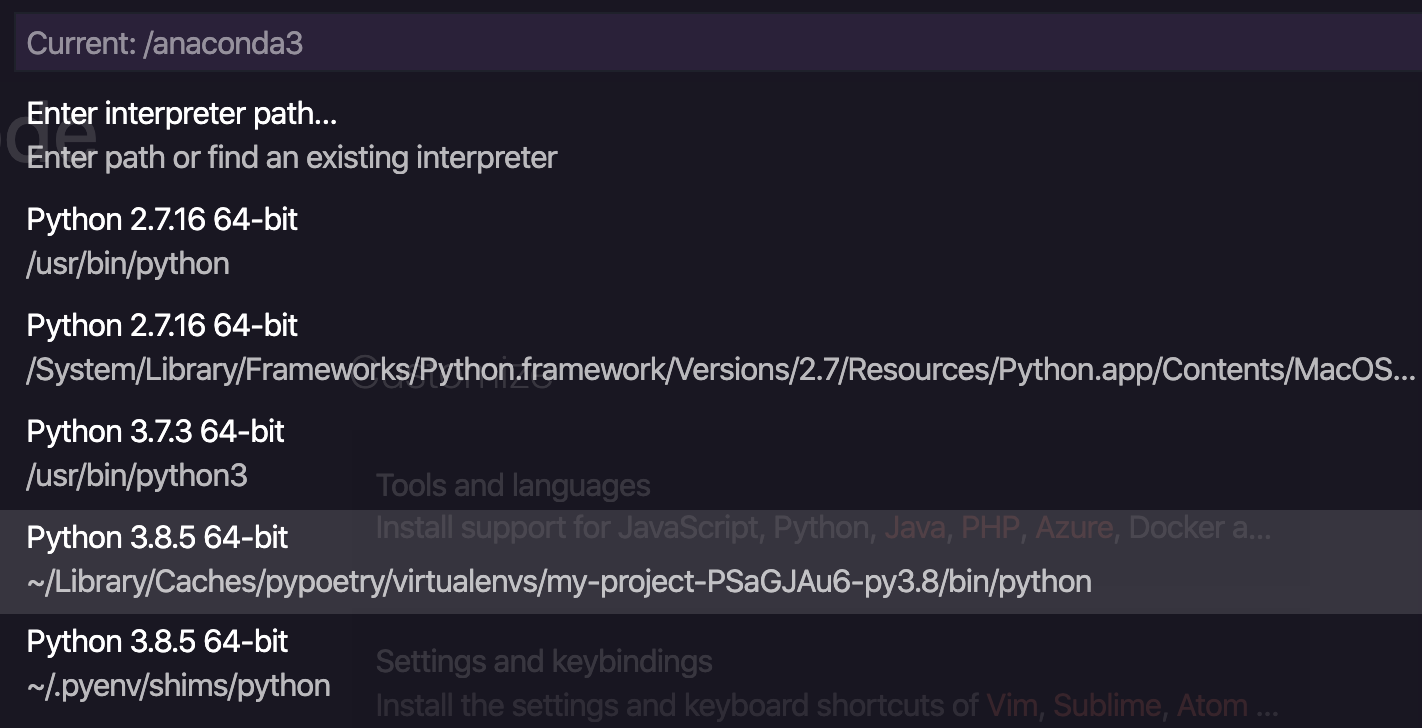
Notice that there are two options for 3.8.5, we should select the one that sits under virtual environment (see file path, it should contain virtualenv).
In general, you can like this Github issue to add support for Poetry to VS Code: https://github.com/microsoft/vscode-python/issues/8372 to keep track of the progress. As Brett Cannon said, VS Code team is reworking environment discovery code, so eventually Poetry will be fully supported by VS Code.
How to upgrade Poetry?
Simply running poetry self update will bump to the most recent version of Poetry.
If you run into error
ImportError: No module named cleo
you’d need to reinstall Poetry by removing it first:
curl -sSL https://raw.githubusercontent.com/python-poetry/poetry/master/get-poetry.py > get-poetry.py
python get-poetry.py --uninstall
python get-poetry.py
rm get-poetry.py
How to upgrade Python version with Poetry and pyenv?
Time has passed and the new Python version was released. There are new features and bugfixes, so we want to bump Python version in our project. This is a pretty straightforward task for pyenv and Poetry.
First, we download, compile and set up the new Python interpreter. Make sure to run this command not from virtual environment but from the project root folder. In my case, I’m going to upgrade to CPython 3.9.2 which is available at the time of writing this text but it can be any other version of CPython interpreter.
pyenv install 3.9.2
pyenv local 3.9.2
pyenv versions
my-project pyenv versions
  system
  3.8.5
* 3.9.2 (set by /Users/alex/iCloud/dev/projects/my-project/.python-version)
Next, we make Poetry use this interpreter for virtual environments.
poetry env use python
Creating virtualenv my-project-PSaGJAu6-py3.9 in /Users/alex.mitelman/Library/Caches/pypoetry/virtualenvs
Using virtualenv: /Users/alex/Library/Caches/pypoetry/virtualenvs/my-project-PSaGJAu6-py3.9
Notice that the project hash remains the same as before but the Python version is now 3.9.
As we have a new virtual environment, we have to reinstall all the dependencies for it:
poetry install
On the next step, we just activate virtual environment and double check that the right version of Python was picked up. We also start VS Code from within the virtual environment, so it is able to discover new environment (make sure to close VS Code before that).
poetry shell
python -V
code .
Finally, at the bottom left corner click on Python and choose the updated version from the list. Make sure that you pick virtual environment version.
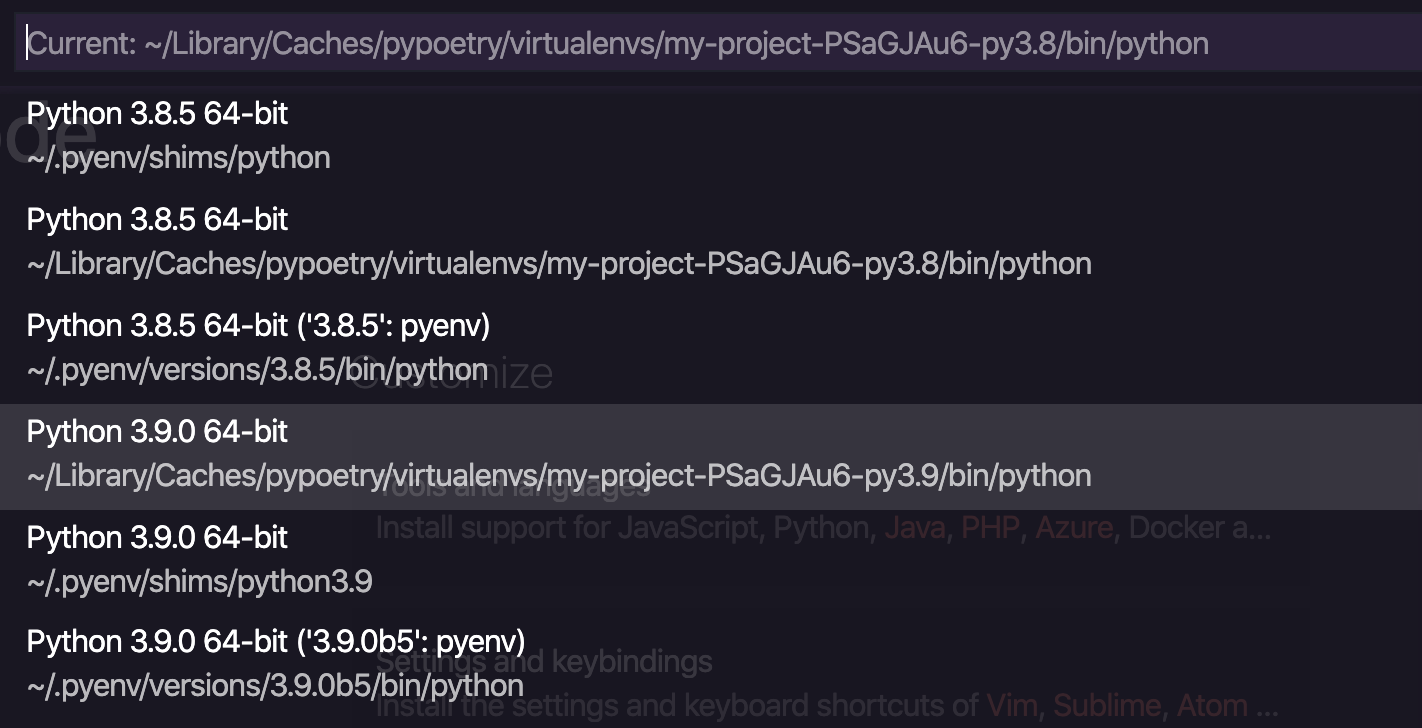
The above images show version 3.9.0 that was used for the previous version of the article
Don’t forget to update [tool.poetry.dependencies] section in pyproject.toml file to reflect the Python version support.
VS Code will prompt you to choose linter, code formatter, etc. Please ignore those prompts for now. We will set them up later on in this tutorial.
Alternative: venv - built in with Python.
How to test with pytest?
Why use pytest?
Tests are important, so first thing we do after creating the project is taking care of tests.
pytest is a popular framework that received a broad adoption. In fact, it’s so popular, that it comes as a default testing framework for Poetry. So if we open [tool.poetry.dev-dependencies] section in pyproject.toml we can see that pytest is already listed there as a development dependency.
More than that, Poetry created tests folder structure for us.
cd tests; ls
__init__.py __pycache__ test_my_project.py
How to use pytest with VS Code?
As an intentionally oversimplified example, let’s create and test function that multiplies two numbers. According to TDD, we create test first.
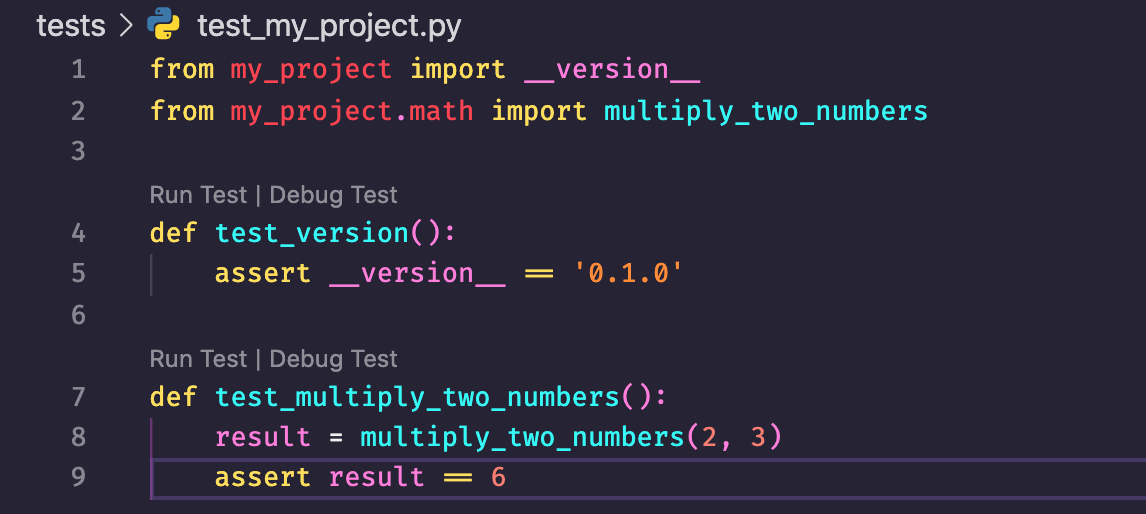
Let’s open test_my_project.py and add import of the function and very simple test:
from my_project.math import multiply_two_numbers

def test_multiply_two_numbers():
    result = multiply_two_numbers(2, 3)
    assert result == 6
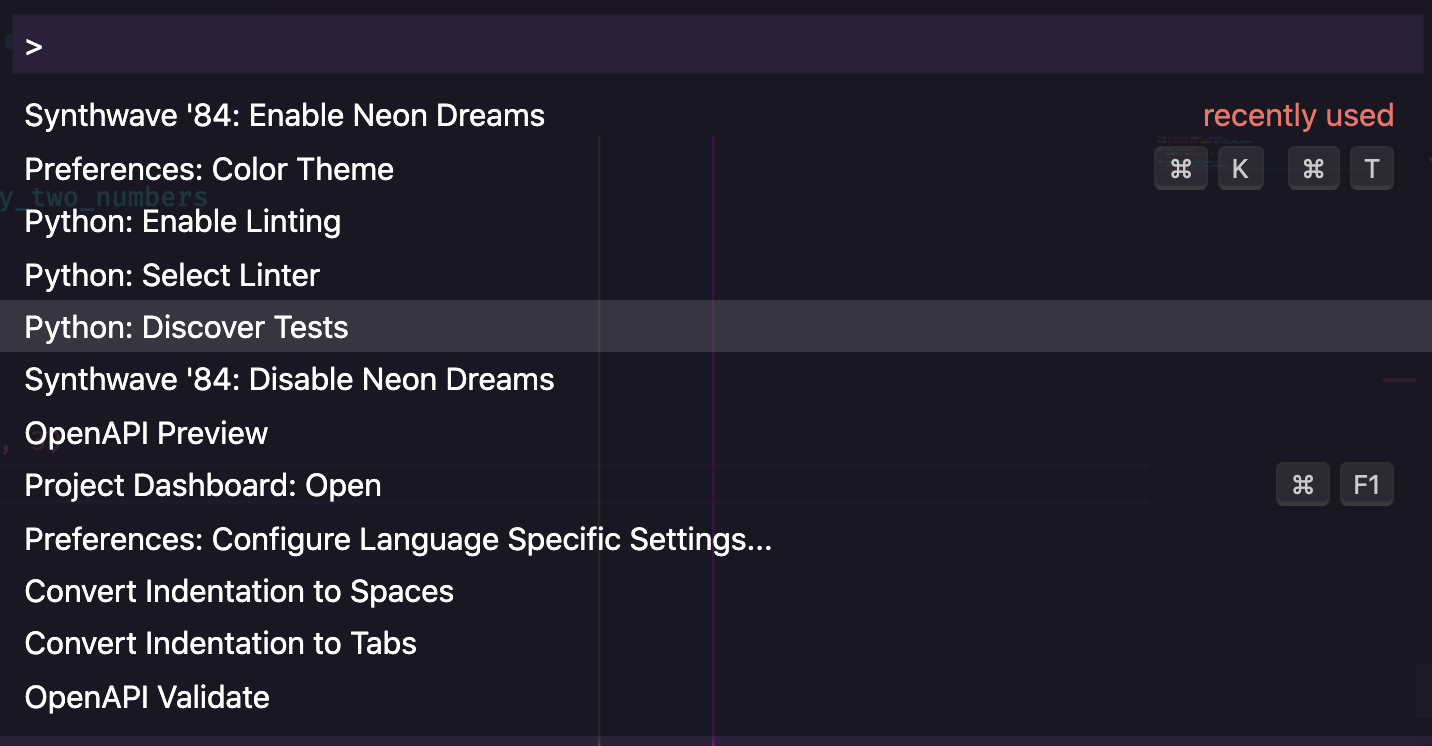
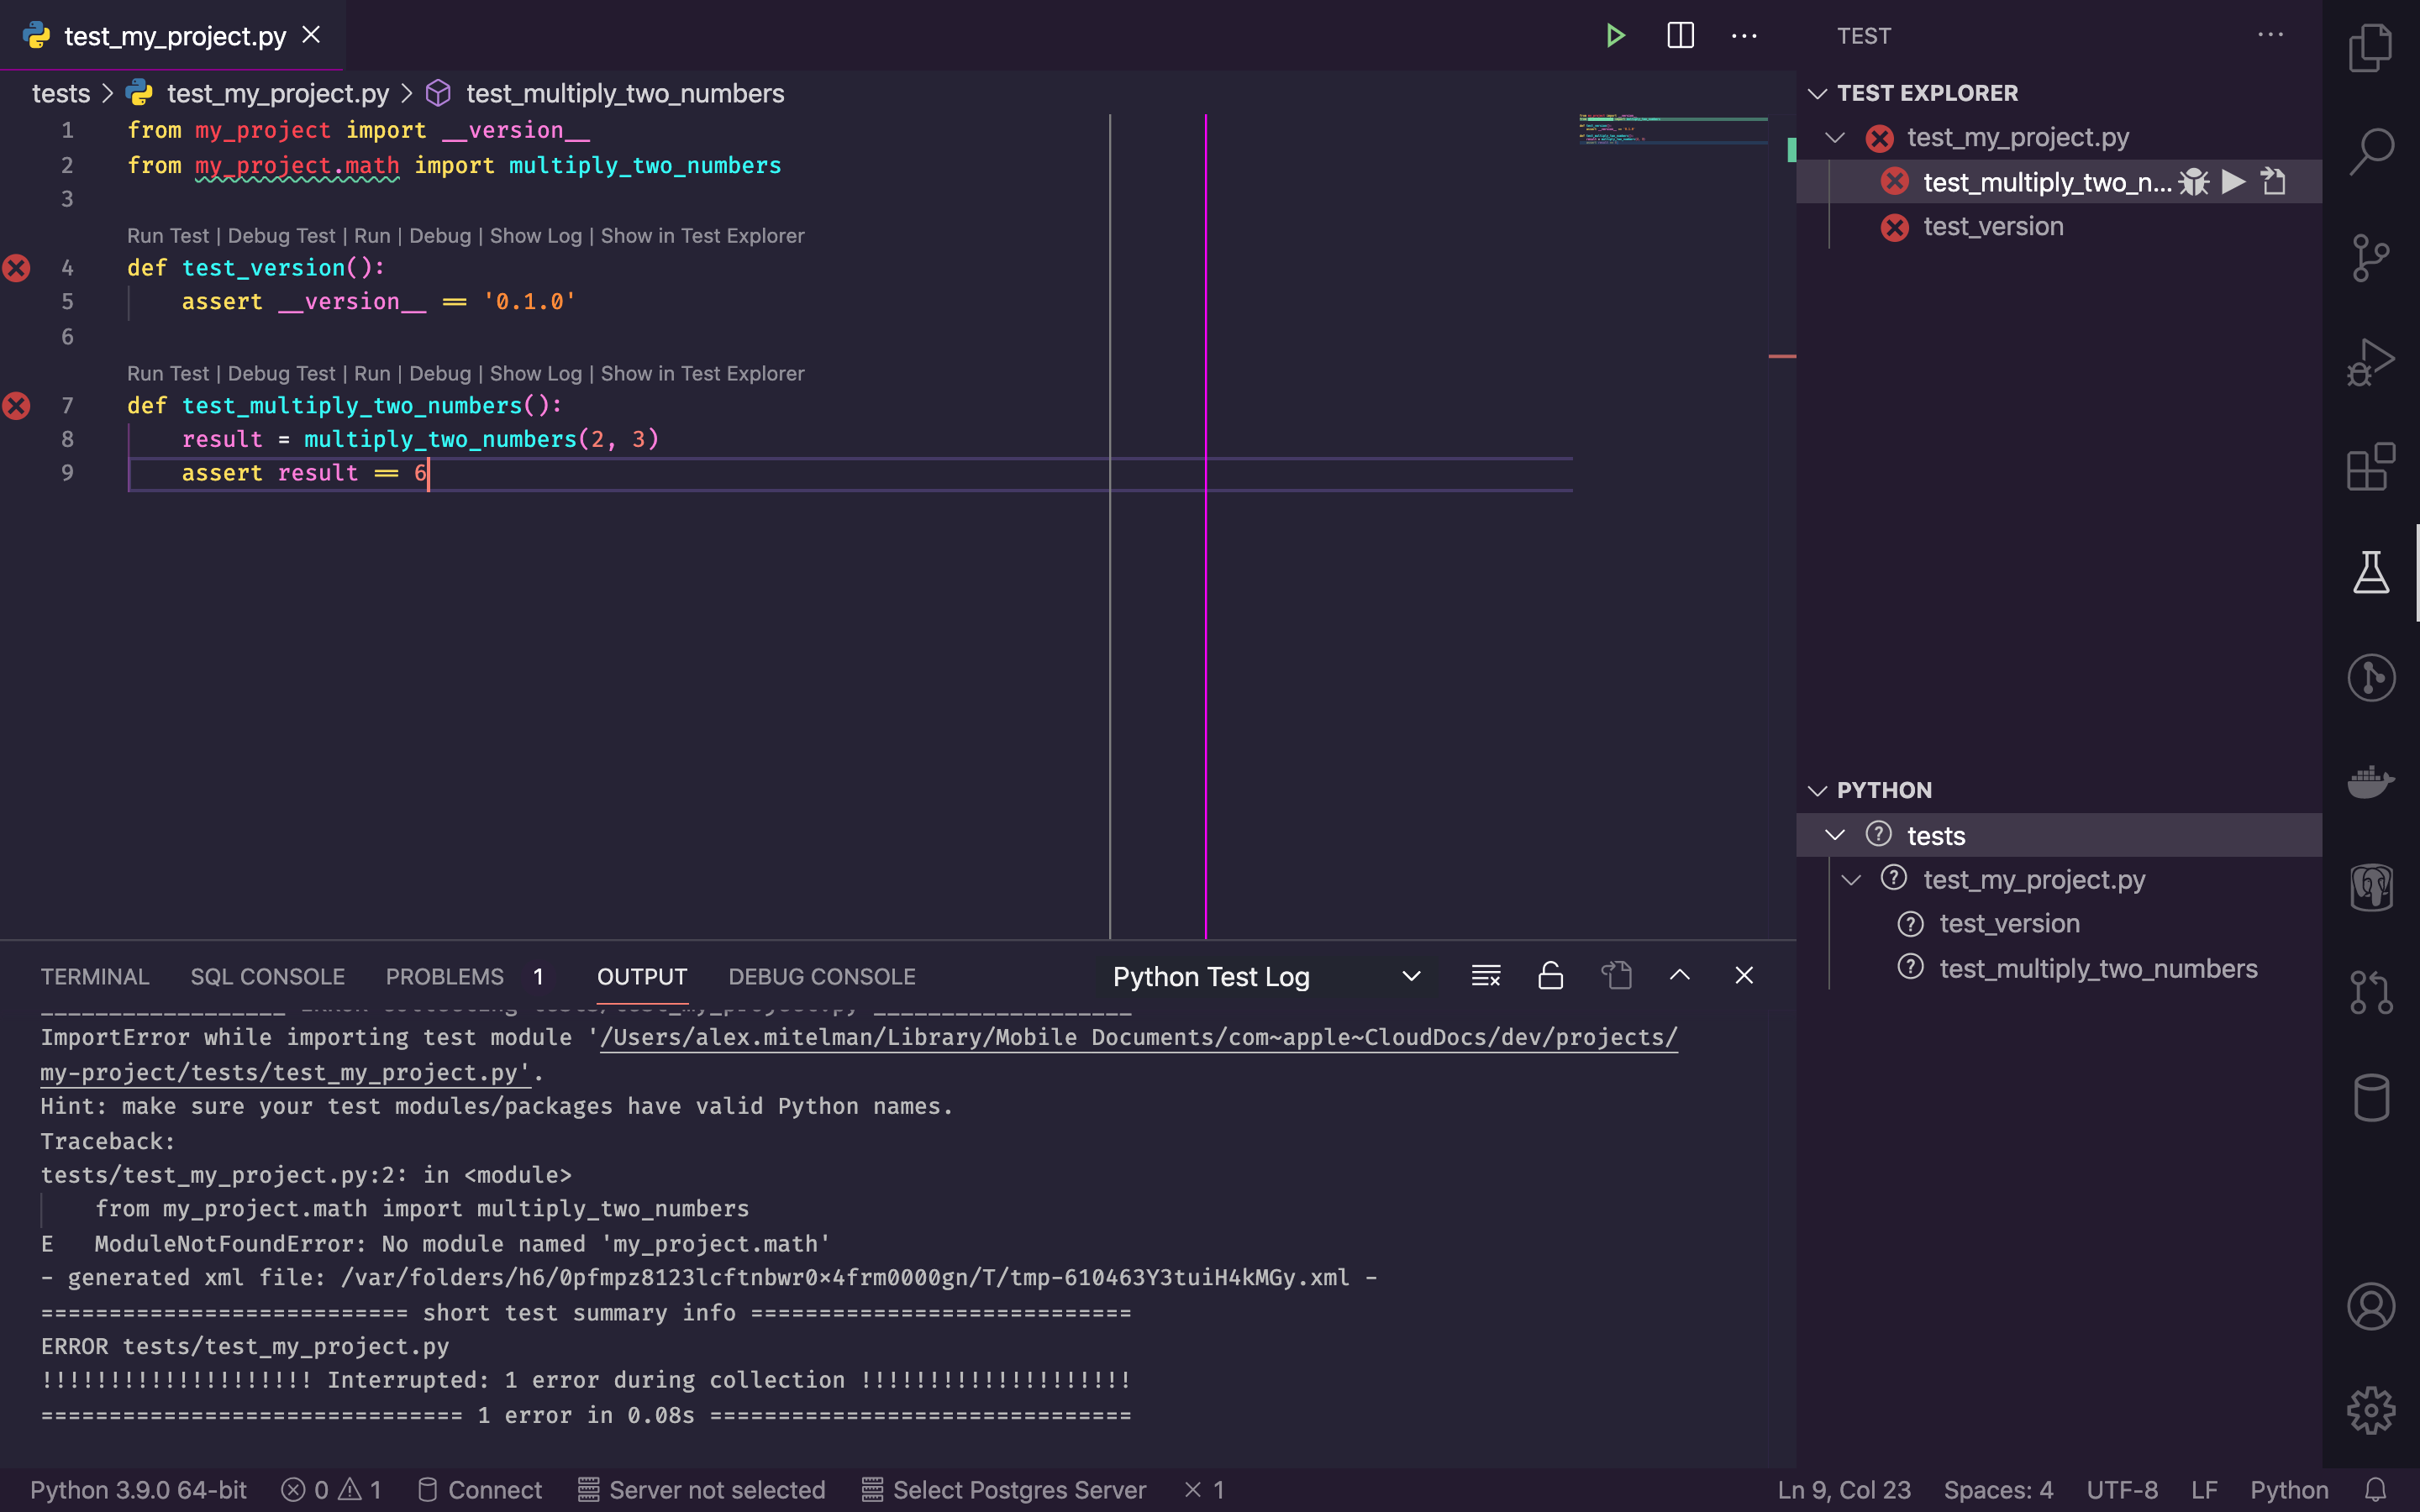
Instead of running our tests from the terminal, let’s take advantage of code editor. ⇧⌘P - start typing “Python: Discover Tests” and select it from the dropdown. (Keybord shortcuts here and further are for macOS)
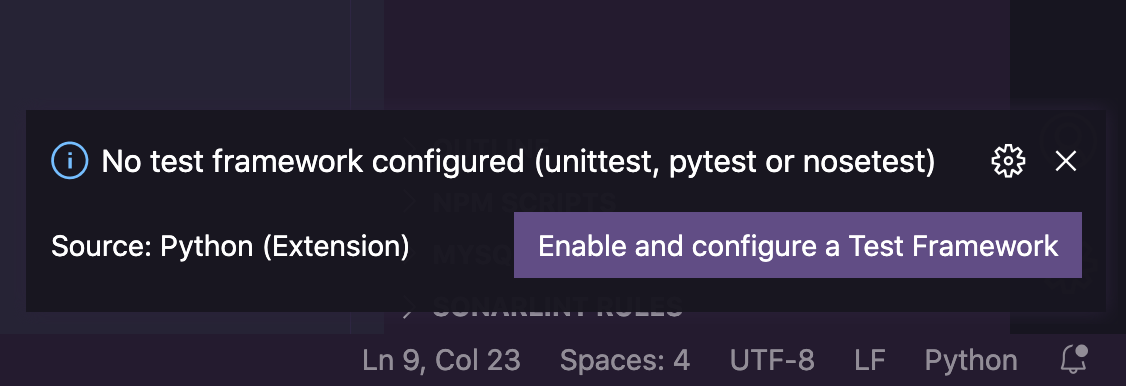
Test framework selection appears in the bottom right corner. Click the button:
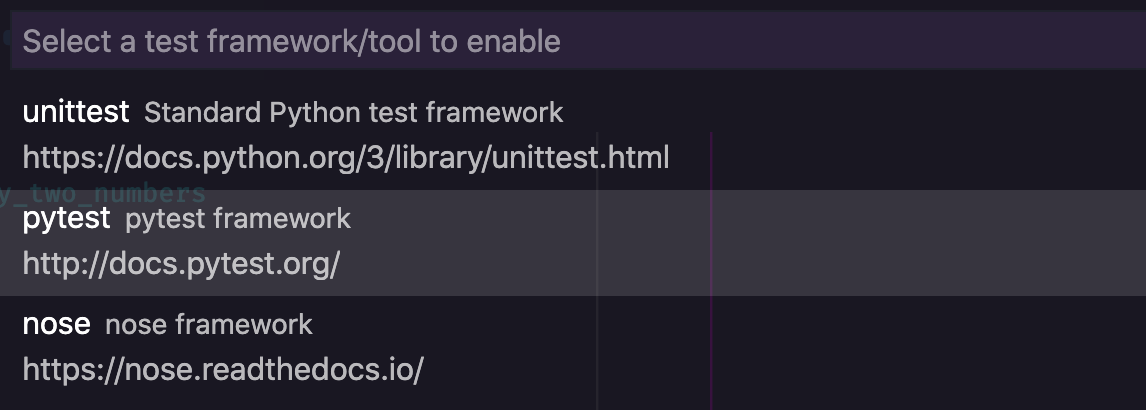
and select pytest in the dropdown:
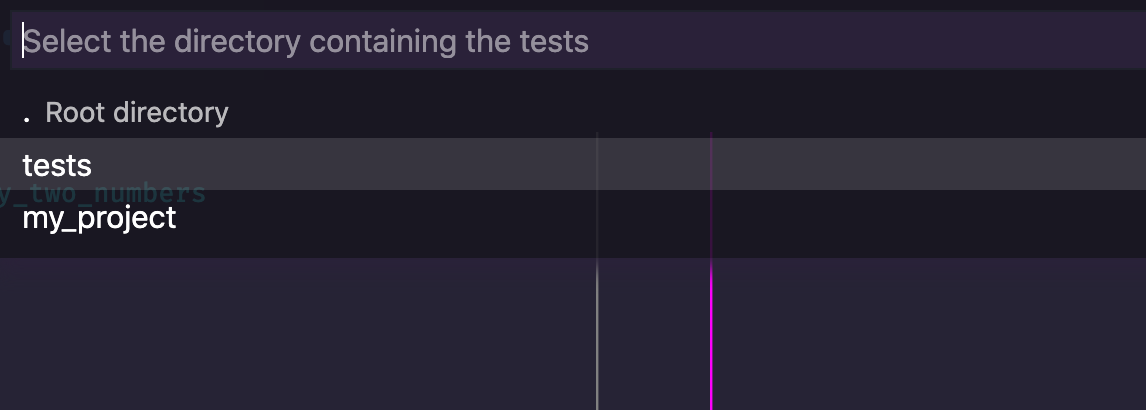
As the last step, it asks you to provide directory that contains all your tests:
VS Code discovered our tests, so now it adds fancy buttons to run or debug particular test.
As we run tests with VS Code, it obviously marks them red as we didn’t implement the function yet.
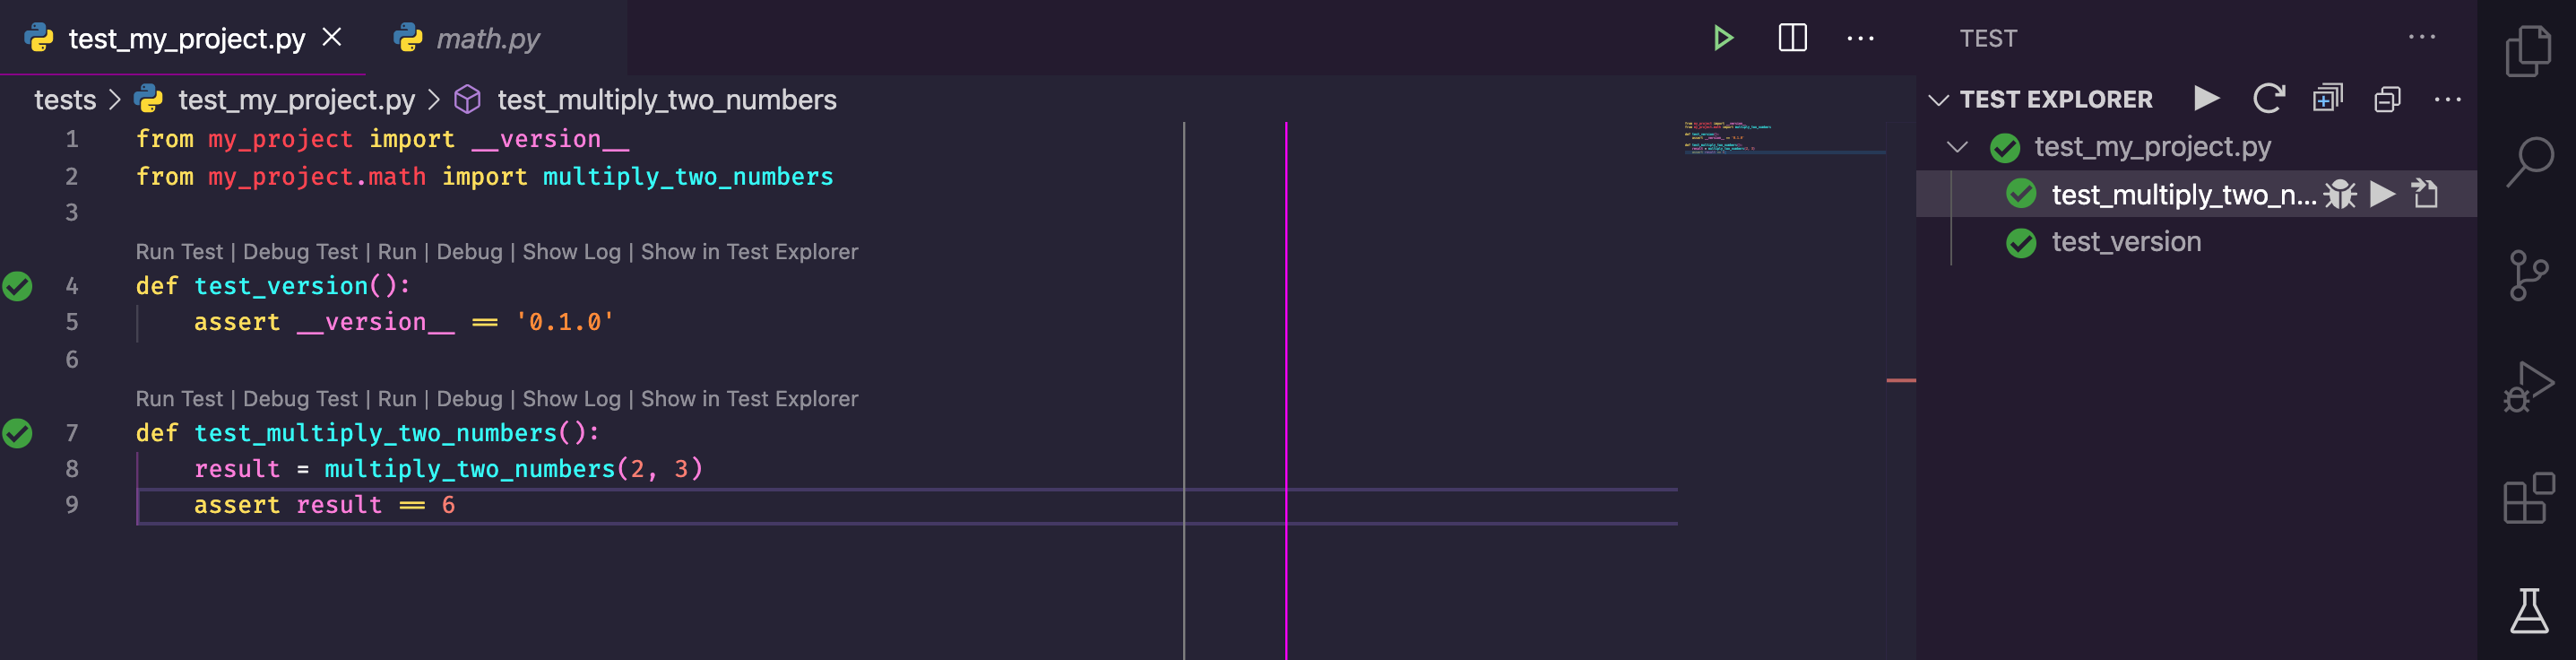
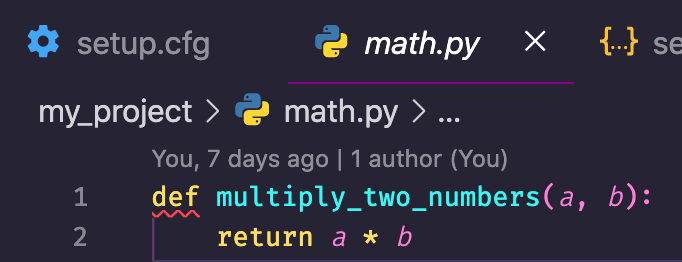
So let’s create math.py file in my_project directory and then implement our simple function:
def multiply_two_numbers(a, b):
    return a * b
As we run tests again, they are marked green now
Alternatively, you can run tests from the command line with
poetry run pytest
or from the activated virtual environment just
pytest
Alternative: unittest - included with default Python distribution. Disadvantages: non-Pythonic camelcase API, slightly harder syntax.
How to measure tests coverage with pytest-cov?
Where tests, there’s coverage. We can install pytest-cov plugin for pytest to measure tests coverage:
poetry add --dev pytest-cov
Now running tests with an additional parameter will generate a coverage report:
pytest --cov=my_project tests/
================================================= test session starts =============
platform darwin -- Python 3.9.2, pytest-5.4.3, py-1.9.0, pluggy-0.13.1
rootdir: /Users/alex/iCloud/dev/projects/my-project
plugins: cov-2.10.1
collected 2 items

tests/test_my_project.py ..                                                  [100%]

----------- coverage: platform darwin, python 3.9.2 -----------
Name                     Stmts   Miss  Cover
--------------------------------------------
my_project/__init__.py       1      0   100%
my_project/math.py           4      0   100%
--------------------------------------------
TOTAL                        5      0   100%

================================================== 2 passed in 0.08s ===============
This also generates .coverage file which we don’t want in our version control, so let’s not forget to add it .gitignore:
echo '.coverage' > .gitignore
How to run checks before committing changes with pre-commit?
Use Git
We didn’t talk about version control yet, and we should. Obviously, we are using Git in 2021. Install or update to the latest version. For macOS:
brew install git
If there is no repository for the project yet, we should create it. Github creates new repositories with main default branch now, so let’s create it this way too:
git init -b main
First thing first, we should have .gitignore file, so we don’t commit some temporary or binary files to the repo. We can manually copy-paste it from here https://github.com/github/gitignore/blob/master/Python.gitignore or simply run following command which will create .gitignore and download content of the above link into it. You must be in your project root directory.
curl -s https://raw.githubusercontent.com/github/gitignore/master/Python.gitignore >> .gitignore
You may exclude VS Code settings folder from version control. In addition, we may also exclude PyCharm settings if someone uses that code editor.
echo '.vscode/\n.idea/' >> .gitignore
Same way
Now let’s add everything we have so far to version control:
git add .
Why run checks before commit?
As you can see (and will see further down in the tutorial), the boilerplate for the project is big. It’s easy to miss out on something or forget to apply some checks before committing your code to the remote repo. As a consequence, the code will not pass CI automation, your colleagues or maintainers may ask you to make some changes to the code during the code review. All this because of a small nitpick like absence of a newline character at the end of a file. Having newline there is a POSIX standard. Even if you are well aware of that, it’s very easy to forget or miss out on this. All this back and forth is just a waste of time which could be easily avoided if there was some automation before we commit a piece of code. And there is.
Please welcome pre-commit. It’s a tool to run automatic checks on every git commit. It’s easy to use and it doesn’t require root access. By the way, pre-commit is written in Python but can be used for projects in various programming languages.
How to install and use pre-commit?
pre-commit can be installed on a system level but we don’t want to do that exactly for the reasons we started using pyenv - we are going to use different Python versions and our dependencies should be in order. That’s why we install pre-commit as a development dependency:
poetry add pre-commit --dev
Going forward we will put all our linters and other stuff into the pre-commit hook. For the time being, we are going to create a simple config for small stuff like end of file newline that we discussed as an example.
There is a command for pre-commit to conveniently create a sample file for us. Executed from our project root:
pre-commit sample-config > .pre-commit-config.yaml
it creates a config file with the following content:
# See https://pre-commit.com for more information
# See https://pre-commit.com/hooks.html for more hooks
repos:
-   repo: https://github.com/pre-commit/pre-commit-hooks
    rev: v2.4.0
    hooks:
    -   id: trailing-whitespace
    -   id: end-of-file-fixer
    -   id: check-yaml
    -   id: check-added-large-files
We can see that pre-commit already created some handy hooks for us. Let’s see how it works. To run checks manually:
pre-commit run --all-files
After running pre-commit, it already found that even file that was created by VS Code didn’t contain newline at the end!
Trim Trailing Whitespace.................................................Passed
Fix End of Files.........................................................Failed
- hook id: end-of-file-fixer
- exit code: 1
- files were modified by this hook

Fixing my_project/math.py
Fixing .vscode/settings.json
Fixing tests/test_my_project.py

Check Yaml...............................................................Passed
Check for added large files..............................................Passed
pre-commit actually fixed that for us, so if we run the same command again, all checks are passed OK.
Trim Trailing Whitespace.................................................Passed
Fix End of Files.........................................................Passed
Check Yaml...............................................................Passed
Check for added large files..............................................Passed
The most important part is to make Git aware of these hooks and to run them before each commit.
pre-commit install
pre-commit installed at .git/hooks/pre-commit
Now, we can commit changes:
git commit -m 'Initial commit'
Trim Trailing Whitespace.................................................Passed
Fix End of Files.........................................................Passed
Check Yaml...............................................................Passed
Check for added large files..............................................Passed
[master (root-commit) 7dc335f] Initial commit
 11 files changed, 559 insertions(+)
 create mode 100644 .gitignore
 create mode 100644 .pre-commit-config.yaml
 create mode 100644 .python-version
 create mode 100644 .vscode/settings.json
 create mode 100644 README.rst
 create mode 100644 my_project/__init__.py
 create mode 100644 my_project/math.py
 create mode 100644 poetry.lock
 create mode 100644 pyproject.toml
 create mode 100644 tests/__init__.py
 create mode 100644 tests/test_my_project.py
As we can see, hooks were run before the commit. Just as planned.
One last thing, we can ask pre-commit to keep config updated to the latest version of tools:
pre-commit autoupdate
It immediately updates hook for me:
Updating https://github.com/pre-commit/pre-commit-hooks ... updating v2.4.0 -> v3.2.0.
Code analysis with Flake8 linter
Why use linter for Python project?
Linters are on the front line of the fight with errors and bugs. They signal you even before you run the code. Obviously, IDEs support linters, so you don’t even have to run the manually. IDE with the help of linter can flag wrong code right in the moment you actually write it.
In Python world, there are lots of linters but two major ones are Flake8 and Pylint.
Pylint is a very strict and nit-picky linter. Google uses it for their Python projects internally according to their guidelines. Because of it’s nature, you’ll probably spend a lot of time fighting or configuring it. Which is maybe not bad, by the way. Outcome of such strictness can be a safer code, however, as a consequence - longer development time.
Most popular open source projects use Flake8. But before we start, there is another hero in the Python world we should talk about.
Python Style Guide - PEP8
Python Style Guide, more famous by it’s Python Enhancement Proposal number- PEP8. Every Python developer should get themselves familiar with PEP8, along with Zen of Python (PEP 20).
After reading through PEP8, you may wonder if there is a way to automatically check and enforce these guidelines? Flake8 does exactly this, and a bit more. It works out of the box, and can be configured in case you want to change some specific settings.
While it’s not as strict as Pylint, it still does a great job on a first line of defense.
That’s why I recommend sticking to Flake8. You can still use Pylint as a second linter but Flake8 is a bare minimum.
How to install Flake8?
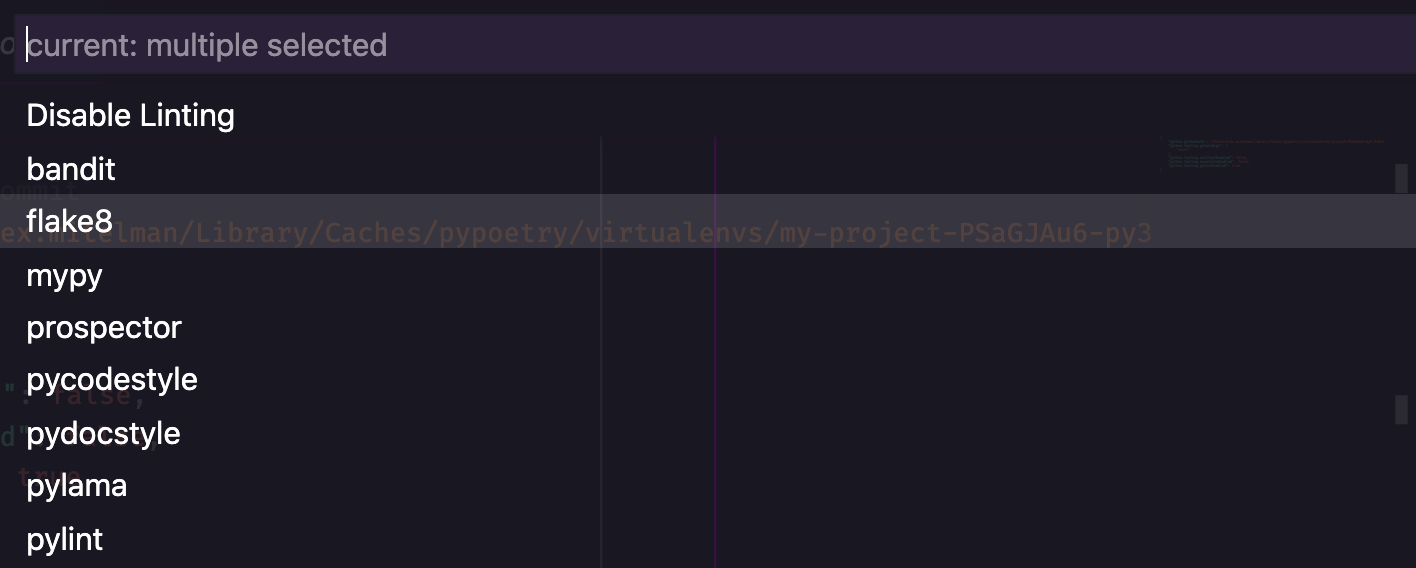
VS Code will prompt you to select linter for the project. You can also press ⇧⌘P, start typing “linter” and choose “Python: Select Linter”

Then choose “flake8”
VS Code should pick up your virtual environment and install Flake8 as a development dependency.
If it doesn’t happen or if you want to install it from the command line, here is a way:
poetry add flake8 --dev
How to use Flake8?
Getting back to a small portion of the code we wrote in a previous section. VS Code marks red some code that linter found problem with. By setting a pointer to that part we can see an error message, error number (that we can search on the internet), and the linter that flagged the error.
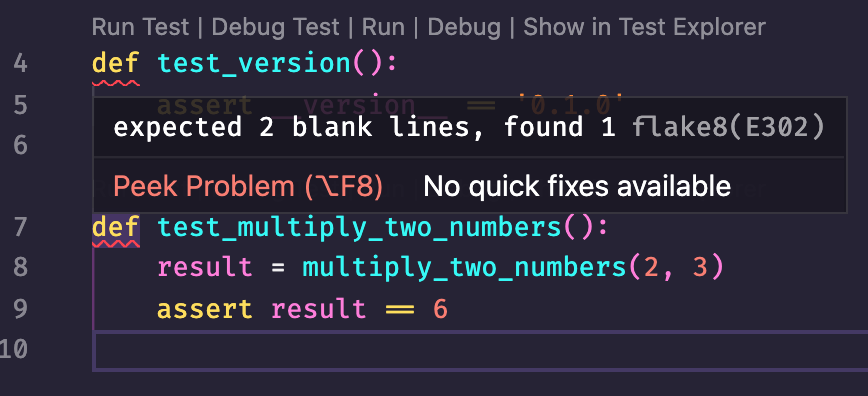
We can also run Flake8 manually to see the same result:
flake8 .
./tests/test_my_project.py:4:1: E302 expected 2 blank lines, found 1
./tests/test_my_project.py:7:1: E302 expected 2 blank lines, found 1
How to add Flake8 to git hooks?
Red marks in IDE is easy to ignore sometimes. It’s also easy to forget running flake8 command before submitting our code. That’s why we have git hooks. We can add Flake8 to the hooks list, so it will check our code with linter automatically.
To do this, open .pre-commit-config.yaml and add following:
-   repo: https://gitlab.com/pycqa/flake8
    rev: 3.8.3
    hooks:
    -   id: flake8
Pay extra attention to rev line. I’ve added version myself here. To figure out version of Flake8 we currently use, I opened pyproject.toml, found version of Flake8, and put it in the pre-commit config file as stated above.
Remember, as we asked pre-commit to keep versions up to date, it would update Flake8 to the most recent version. But as we already use the newest version of the linter, nothing extra will be done here. pre-commit will download this version of Flake8 because it runs its checks in the separate environment. This means that we basically have two versions of Flake8 now, and we should make sure that they are actually the same version. Usually updating to the latest version shouldn’t be an issue but if it is, it’s recommended to turn auto update off for pre-commit.
As we change config file, let’s stage it:
git add .pre-commit-config.yaml
And commit:
git commit -m 'Add Flake8 to git hooks'
Trim Trailing Whitespace.................................................Passed
Fix End of Files.........................................................Passed
Check Yaml...............................................................Passed
Check for added large files..............................................Passed
flake8...............................................(no files to check)Skipped
[master 1d25c9f] Add Flake8 to git hooks
 1 file changed, 4 insertions(+)
Let’s try running pre-commit manually again to see how it picked up Flake8:
pre-commit run --all-files
Trim Trailing Whitespace.................................................Passed
Fix End of Files.........................................................Passed
Check Yaml...............................................................Passed
Check for added large files..............................................Passed
flake8...................................................................Failed
- hook id: flake8
- exit code: 1

tests/test_my_project.py:4:1: E302 expected 2 blank lines, found 1
tests/test_my_project.py:7:1: E302 expected 2 blank lines, found 1
Don’t hurry fixing this error to satisfy the linter. Computer already found the error. If it’s already of it, wouldn’t it be great to fix this error automatically?
Formatting code with Black
Why to format code with Black?
Every person writes code in their own style. Even on Python which forces you pretty much to indent blocks of code, it is very much possible to write the same thing in different ways.
Sometimes, just by looking at some part of code, you could say what person wrote it. What if different people touched the same code and wrote different parts of it in their own style? It can look a bit ugly.
How can we prevent it? We can argue during the code review of course. This can significantly slow down merging such pull request. Also, arguing about style is pretty much a matter of taste. At the end of the day, people will argue about the looks instead of paying attention to what the code actually does.
In addition, wouldn’t it be nice if code looked the same across an entire project, just like it was written by one person?
There is a solution for it, and it’s called Black.
Black formats the code in its own style, so it looks consistent. There is very little that you can customize in Black, so even this case there is no room for an argument. Just take it and use it as it is. After all, things like PEP8 and Black were created to agree on one style and just stop arguing about it.
Ironically, Black violates PEP8’s line length rule. Here is a thing, PEP8 told us that the maximum line length should be no more than 79 characters. It goes deep into history of IBM punch cards and UNIX terminals. PEP8 was written in 2001, things changed since then. People started questioning this rule. “I don’t read the code from a UNIX terminal”, - they say. “I have 27” monitor for a reason", - they say. There is a problem with that though. Some people work with code from 13" laptops. And viewing diff of two files of 79 char per line max becomes very convenient. Otherwise, you have to scroll horizontally, which is not very nice for working with code. That’s why I still think that 79 chars rule should be there.
And yes, while PEP8 was created in 2001, it’s received some updates since then but 79 char per line rule was never changed.
Thankfully, this is an option that Black allows us to adjust.
How to install Black?
In VS Code, open some Python file in our project. In my case, I have test_my_project.py that Flake8 was complaining about. ⇧⌘P and start typing “format”, then choose “Format Document”.
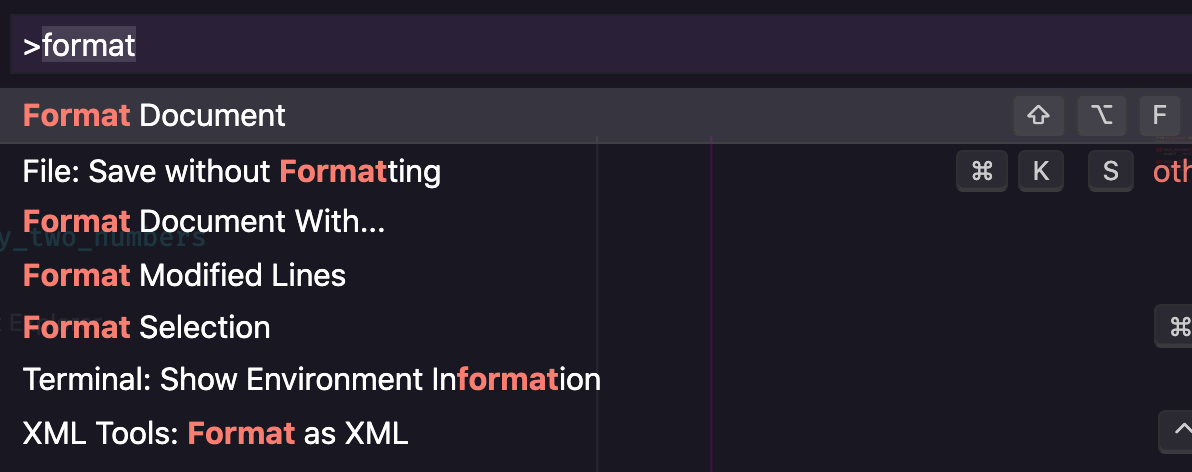
It will ask you which formatter would you like to use.

Click “Use black”.
VS Code will detect that we use Poetry and will install Black for us automatically.
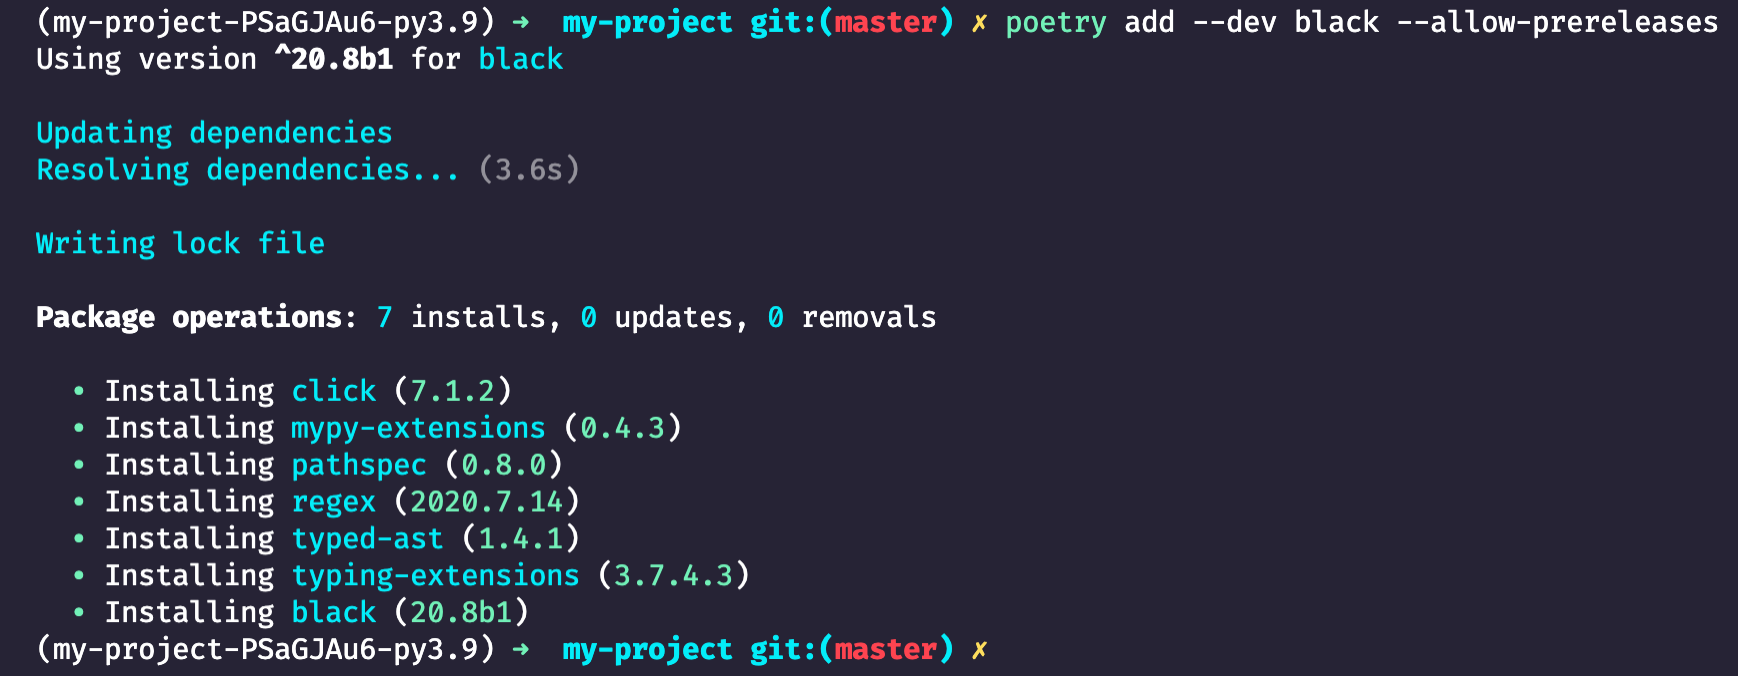
Optionally, you can install it manually with:
poetry add --dev black --allow-prereleases
--allow-prereleases option is here because Black is actually still in Beta in 2021. Initially, 2019 releases were planned to be the last ones in this status but it is what it is. Many production and open source projects already use it by default to format the code, so it’s pretty safe to assume that Black is relatively stable.
To configure Black, let’s open pyproject.toml and add following section:
[tool.black]
line-length = 79
target-version = ['py38']
include = '\.pyi?$'
exclude = '''

(
  /(
      \.eggs         # exclude a few common directories in the
    | \.git          # root of the project
    | \.hg
    | \.mypy_cache
    | \.tox
    | \.venv
    | _build
    | buck-out
    | build
    | dist
  )/
  | foo.py           # also separately exclude a file named foo.py in
                     # the root of the project
)
'''
The most important part here is that we set max line length to 79.
Also, if you use some other version of Python, make sure to update but double check that it’s supported by Black here.
We also have to suppress some error at Flake8 to make it work with Black. For this, we have to create setup.cfg file, which is a config file for Flake8, and put following in there:
[flake8]
extend-ignore = E203
How to use Black?
Black usage is fairly simple. Just run it, and it formats the code:
black .
reformatted /projects/my-project/my_project/__init__.py
reformatted /projects/my-project/tests/test_my_project.py
All done! ✨ 🍰 ✨
2 files reformatted, 2 files left unchanged.
Remember Flake8 was complaining about some absent new lines? If we run our Git hook now, everything is OK.
pre-commit run --all-files
Trim Trailing Whitespace.................................................Passed
Fix End of Files.........................................................Passed
Check Yaml...............................................................Passed
Check for added large files..............................................Passed
flake8...................................................................Passed
How to add Black to git hooks?
Same as with Flake8, it would be great to automate running Black, so we don’t have to bother. Let’s add following to .pre-commit-config.yaml
-   repo: https://github.com/psf/black
    rev: 20.8b1
    hooks:
      - id: black
Let’s run pre-commit run --all-files again. We can see that it downloads Black and uses it:
[INFO] Initializing environment for https://github.com/psf/black.
[INFO] Installing environment for https://github.com/psf/black.
[INFO] Once installed this environment will be reused.
[INFO] This may take a few minutes...
Trim Trailing Whitespace.................................................Passed
Fix End of Files.........................................................Passed
Check Yaml...............................................................Passed
Check for added large files..............................................Passed
flake8...................................................................Passed
black....................................................................Passed
I will not describe saving changes to git. The flow is the same as for Flake8.
Alternative: yapf - https://github.com/google/yapf
Bonus
You can add ruler to VS Code so there is a vertical line showing you the edge of 79 characters.
Open settings.json in .vscode directory and add following:
"[python]": {
        "editor.rulers": [72, 79]
    }
This will add rulers only for Python. 72 chars is for docstrings.
Static typing with Mypy
Why use static type checker with Python?
Type wars started in 70s. IBM with Smalltalk against Sun with Java. As we all know, strongly typed Java won, although Smalltalk being dynamically typed language was considered as a competitive advantage by some companies due to rapid development. Of course, type reduces amount of bugs and runtime errors which can be also solved by having 100% test coverage (as Uncle Bob claims, that’s one of the reasons of Python’s success). However, let’s not forget that not all projects have 100% coverage.
But can we have best of two worlds? Can we have type safety with rapid software development? I think, with Mypy we can. Mypy is a static code analysis tool that makes sure that the code is type safe. The project became so valuable that Python creator Guido van Rossum added type annotations to Python and joined Mypy development. Using type annotations also helps IDE to provide a better code completion. As a bonus, type annotations make code more readable for humans too.
How to install mypy
In VS Code, you can edit settings.json file in .vscode directory. Set "python.linting.mypyEnabled": true. After that, open any Python file in the project, for example math.py. VS Code will detect that Mypy is not installed yet.

Click install, and it will automatically install it with Poetry.
Alternatively, you can install Mypy manually:
poetry add --dev mypy
How to use mypy?
Now we can try running this tool on our small project:
mypy .
Success: no issues found in 4 source files
So far so good, we didn’t even have to make any changes to our code, Mypy automatically detects types to run checks.
But as we mentioned previously, having type annotations helps us better understand code, and makes IDE provide better code completions, so let’s take advantage of that.
Open setup.cfg file and add following:
[mypy]
follow_imports = silent
strict_optional = True
warn_redundant_casts = True
warn_unused_ignores = True
disallow_any_generics = True
check_untyped_defs = True
no_implicit_reexport = True
disallow_untyped_defs = True
ignore_missing_imports = True
The most important line here is disallow_untyped_defs = True. It forces you to define functions with types. For existing legacy projects, you’d probably disable it but as we create a new project, it’s would be beneficial to make sure we never forget to add type annotations.
You may want to disable Mypy for tests. Just add following config:
[mypy-tests.*]
ignore_errors = True
For better compatibility, there are various plugins for Mypy. For example, if you plan to use pydantic for data validation and serialization, config file will look like this:
[mypy]
plugins = pydantic.mypy

follow_imports = silent
strict_optional = True
warn_redundant_casts = True
warn_unused_ignores = True
disallow_any_generics = True
check_untyped_defs = True
no_implicit_reexport = True
disallow_untyped_defs = True
ignore_missing_imports = True

[pydantic-mypy]
init_forbid_extra = True
init_typed = True
warn_required_dynamic_aliases = True
warn_untyped_fields = True
Here is the output after we added new config:
my_project/math.py:1: error: Function is missing a type annotation
Found 1 errors in 1 files (checked 4 source files)
In addition, VS Code uses Mypy as a linter and marks incorrect parts:
To fix it, let’s add type annotation to our function:
from numbers import Real
from typing import Union

def multiply_two_numbers(a: Union[int, Real], b: Union[int, Real]) -> Union[int, Real]:
    return a * b
As we can see, function definition got too long. By pressing ⇧⌥F , VS Code formats code with Black to make it fit into 79 characters per line:
from numbers import Real
from typing import Union

def multiply_two_numbers(
    a: Union[int, Real], b: Union[int, Real]
) -> Union[int, Real]:
    return a * b
Commit changes:
git commit -m 'Add Mypy'
How to add mypy to git hooks?
Obviously, we want to make sure that Mypy runs before committing the code. Add following to .pre-commit-config.yaml:
-   repo: https://github.com/pre-commit/mirrors-mypy
    rev: v0.782
    hooks:
        - id: mypy
          additional_dependencies: [pydantic]  # add if use pydantic
As we run pre-commit run --all-files it installs Mypy for pre-commits and runs checks:
[INFO] Installing environment for https://github.com/pre-commit/mirrors-mypy.
[INFO] Once installed this environment will be reused.
[INFO] This may take a few minutes...
Trim Trailing Whitespace.................................................Passed
Fix End of Files.........................................................Passed
Check Yaml...............................................................Passed
Check for added large files..............................................Passed
flake8...................................................................Passed
black....................................................................Passed
mypy.....................................................................Passed
Sorting imports with isort
One last thing: imports.
Why sort imports isort?
PEP8 specifies that imports should be sorted in the following order: standard library, third party, local. In addition we want imports to be beautiful and human friendly.
And there is a tool for that. Meet isort which stands for “import sort”. Here is an example from official site to get a sense of it.
Before:
from my_lib import Object

import os

from my_lib import Object3

from my_lib import Object2

import sys

from third_party import lib15, lib1, lib2, lib3, lib4, lib5, lib6, lib7, lib8, lib9, lib10, lib11, lib12, lib13, lib14

import sys

from __future__ import absolute_import

from third_party import lib3
After:
from __future__ import absolute_import

import os
import sys

from third_party import (lib1, lib2, lib3, lib4, lib5, lib6, lib7, lib8,
                         lib9, lib10, lib11, lib12, lib13, lib14, lib15)

from my_lib import Object, Object2, Object3
Way better, isn’t it?
How to install, use, and add isort to git hooks?
VS Code (with Python extension) uses isort internally, so there is no additional configuration required. If you don’t plan to use it from the command line, there is even no need to install it separately because pre-commit installs all dependencies to its own separate environment.
But if you plan to use isort apart from VS Code and pre-commit, here is how to install it:
poetry add --dev isort
To make it works with Black correctly, we should add following to pyproject.toml:
[tool.isort]
multi_line_output = 3
include_trailing_comma = true
force_grid_wrap = 0
use_parentheses = true
line_length = 79
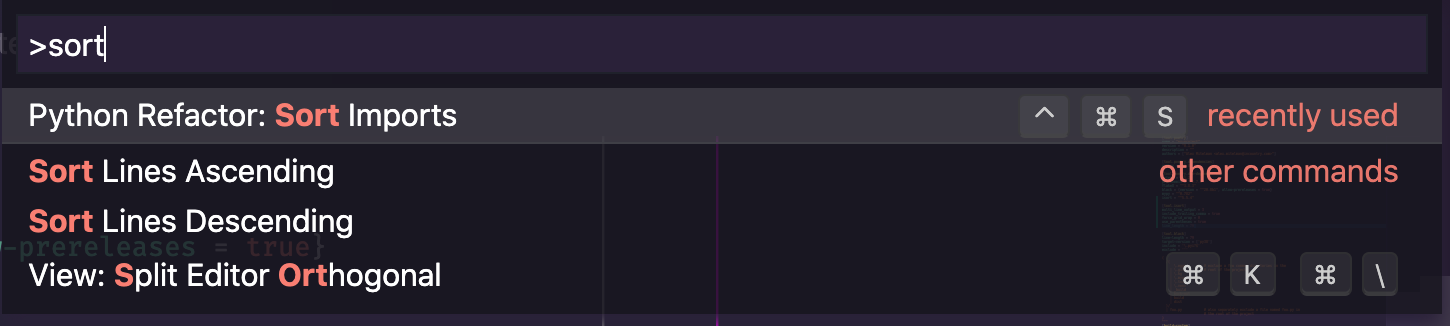
In VS Code, ⇧⌘P, then start typing “sort imports”. VS Code will show:
Alternatively, if you installed it, run in the project root:
isort .
Skipped 2 files
As a final step, let’s add it to the hooks list in .pre-commit-config.yaml:
-   repo: https://github.com/PyCQA/isort
    rev: 5.4.2
    hooks:
    -   id: isort
See it works with pre-commit run --all-files:
Trim Trailing Whitespace.................................................Passed
Fix End of Files.........................................................Passed
Check Yaml...............................................................Passed
Check for added large files..............................................Passed
flake8...................................................................Passed
black....................................................................Passed
mypy.....................................................................Passed
isort....................................................................Passed
Fast track
Here is how you can create a fully configured new project in a just a couple of minutes (assuming you have pyenv and poetry installed already).
poetry new my-project; cd my-project; ls
pyenv local 3.9.2
poetry env use python
poetry add --dev pytest-cov pre-commit flake8 mypy isort
poetry add --dev --allow-prereleases black
poetry shell
code .
Add config to pyproject.toml:
[tool.isort]
multi_line_output = 3
include_trailing_comma = true
force_grid_wrap = 0
use_parentheses = true
line_length = 79

[tool.black]
line-length = 79
target-version = ['py38']
include = '\.pyi?$'
exclude = '''

(
  /(
      \.eggs         # exclude a few common directories in the
    | \.git          # root of the project
    | \.hg
    | \.mypy_cache
    | \.tox
    | \.venv
    | _build
    | buck-out
    | build
    | dist
  )/
  | foo.py           # also separately exclude a file named foo.py in
                     # the root of the project
)
'''
Create setup.cfg:
[flake8]
extend-ignore = E203

[mypy]
follow_imports = silent
strict_optional = True
warn_redundant_casts = True
warn_unused_ignores = True
disallow_any_generics = True
check_untyped_defs = True
no_implicit_reexport = True
disallow_untyped_defs = True
ignore_missing_imports = True

[mypy-tests.*]
ignore_errors = True
Create .pre-commit-config.yaml.
repos:
-   repo: https://github.com/pre-commit/pre-commit-hooks
    rev: v3.4.0
    hooks:
    -   id: trailing-whitespace
    -   id: end-of-file-fixer
    -   id: check-yaml
    -   id: check-added-large-files
-   repo: https://gitlab.com/pycqa/flake8
    rev: 3.8.4
    hooks:
    -   id: flake8
-   repo: https://github.com/psf/black
    rev: 20.8b1
    hooks:
      - id: black
-   repo: https://github.com/pre-commit/mirrors-mypy
    rev: v0.812
    hooks:
        - id: mypy
          additional_dependencies: [pydantic]  # add if use pydantic
-   repo: https://github.com/PyCQA/isort
    rev: 5.7.0
    hooks:
    -   id: isort
echo '.coverage' > .gitignore
echo '.vscode/\n.idea/' >> .gitignore
curl -s https://raw.githubusercontent.com/github/gitignore/master/Python.gitignore >> .gitignore
git init -b main
git add .
git commit -m 'Initial commit'
pre-commit install
pre-commit autoupdate
pre-commit run --all-files
pre-commit run --all-files
Conclusion
We’ve come a long way. Congrats if you’ve made it all the way from the beginning. I get that probably it was super overwhelming. The point of doing all this work is to set up a new project once and forget about it for a long time. For any further project it will be very quick, I promise. Just skip to Fast Track section, then it’s just a couple of minutes to set up all the necessary components. Now, it’s time to get our hands dirty with some actual code.

This work is licensed under a Creative Commons Attribution-NonCommercial 4.0 International License.